Zoom Easter Eggs: Hidden Features of the Video Conferencing Platform

[su_box title=”❗ Update Your Zoom Security Settings” style=”soft” box_color=”#171411″] As Zoom’s developers continue to update the back-end security of the video-conferencing application, new settings allow individuals to mitigate the risk of Zoombombing and other vulnerabilities.
To review those recommended settings, click the link below.
[su_button url=”https://rocketit.com/zoom-security” target=”blank” style=”flat” background=”#15659a” size=”5″ center=”yes” icon=”icon: gear”]Review Zoom Security Settings[/su_button]
[/su_box]
Often associated with childhood memories of hiding brightly colored eggs; mentioning the term “Easter Egg” is likely to spark joy and nostalgia with many individuals across the United States. But whereas the traditional hiding of eggs has commonly been limited to the early days of Spring, the modern-era has made it a year-long activity.
By today’s standard, Easter eggs refer to hidden features; placed intricately within a software by its developers. Typically, these unadvertised features go unnoticed for extended periods of time; only being brought to light by the technology’s community of avid users. And although some of these hidden components are simply included for novelty purposes, others have the potential to positively impact a user’s experience. Needless to say, Easter eggs are present in a slew of programs; including some popular applications that an individual may find themselves using on a daily basis.
Keeping that in mind, as people shift to telecommuting and working remotely, it’s likely that they’ll have an experience over the video web conferencing platform known as Zoom. And although, upon first glance, the simplicity of Zoom’s user interface makes it easy to control; don’t be fooled. A bounty of Easter eggs lies deeply buried in the app’s settings, and it’s Rocket IT’s goal to hunt them down.
What Sets Zoom Apart?
Whether it be Skype, Apple Facetime, or Google Hangouts, it’s likely that most people have used some form of internet video calling in the past. While these applications are okay for quick, informal conversations, they lack the collaborative tools and formality present in Zoom. For those that are unaware, Zoom is a stand-alone software that offers both a web conferencing and webinar platform. Because of this, it’s rather simple to set up video calls with individuals inside and outside of an organization; making it a great tool to keep face-to-face interaction strong with clients, internal teams, and community members under remote working conditions.
Now with an understanding of Zoom’s core concept, let’s delve into some of the quirky Easter egg features that further differentiate the product from its competition.
Easter Eggs for Basic (Free) Accounts
How to Change Zoom’s Background
As nice as it would be to work remotely in a poolside cabana or a peaceful cabin resting upon a quiet mountain-top, the reality is that many people are quarantined to their home office. But who’s to say one can’t pretend to be elsewhere?
Desktop
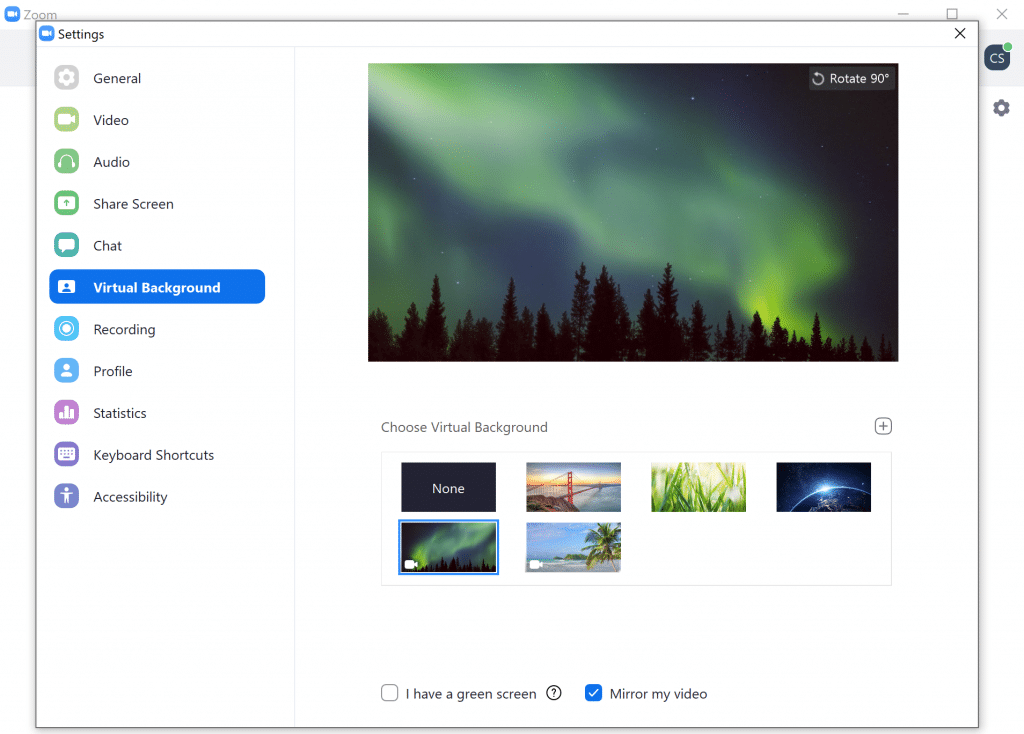
Using Zoom’s virtual background feature, individuals can upload and replace their background with any image they’d like. And better yet, no green-screens or plugins are needed. To enable this setting on desktop, login to Zoom and navigate to settings by clicking your account icon in the top-right corner of the client window. From the options listed on the left side of the screen, select Virtual Background and click the small “+” icon above the list of default Zoom backgrounds. For best results, those using a standard 16:9 aspect ratio on their cameras should stick to either a 1280×720 or 1920×1080 dimension so that no stretching or blurring of the image occurs.
Mobile
For those looking to enable the same feature on iPhone devices, first download the app and join a meeting. In the bottom-right corner of the screen, tap the “more” tab. Select the Virtual Background option and allow the app to access your camera roll to add a custom image.
Keep in mind, not only is plenty of light needed to achieve the best results, but individuals need to make sure their clothes contrast in color from the real background behind them. Doing so will make sure Zoom’s background can easily detect the user from their surroundings.
Appearance Touch Up
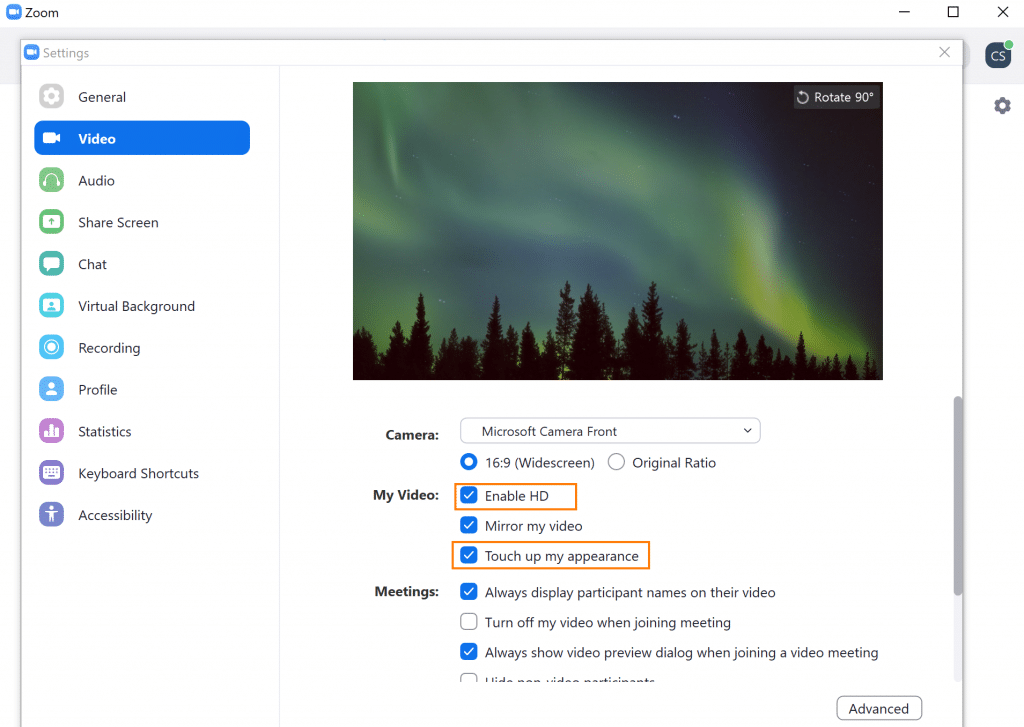
Sweatpants, Hoodies, and messy hair may be a uniform worn by many remote workers, but joining a video call requires individuals to class up their wardrobe. And although step one may be to put on some pants, step two should consist of ample mirror time to make sure the face is acceptable for public display. But what if you don’t have time to throw on a full face of makeup or quickly trim the beard? Zoom’s “Touch Up Appearance” feature is a great alternative. Simply put, it’s like an instant and live photoshop for your face.
To enable this setting, open the Zoom client on a desktop and navigate to settings by clicking your account icon in the top-right corner. Once the setting menu is open, select Video and click the checkbox next to “Touch Up My Appearance”. While in these settings panel, also consider enabling the HD option. Doing so will make a small, yet noticeable, improvement to the Touch Up My Appearance setting you previously enabled.
Share Computer Audio
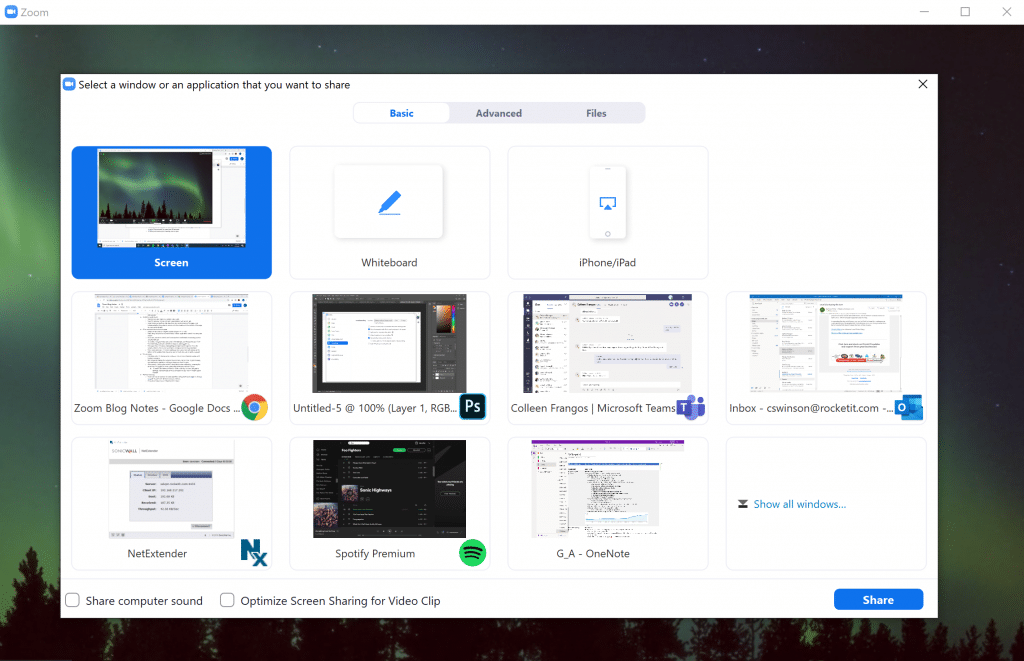
Zoom’s share feature is a big part of what makes this app so useful. Need to give a PowerPoint presentation via the web? No problem. Want to show a colleague how to access a certain file? Easy. But what many might not know is that Zoom not only makes it easy to share what’s on the screen, it also offers the ability to share the audio of that content. In turn, one group member can stream a single YouTube video or podcast episode to all other participants in a meeting.
To use this feature, begin by hosting a meeting in Zoom. Click the Share Screen icon at the bottom of the open window as you normally would. But before selecting the window to share, check the box at the bottom titled “Share computer sound”.
Allow Others to Control Your Computer
If you thought Zoom’s capabilities stopped at video meetings and webinar recordings, this next one going to be a surprise. In addition to providing basic video calling, Zoom can be used as a digital support platform to resolve technical problems.
To toggle this feature on, head back over to the Zoom web portal, click My Account, and select Settings. In the meeting tab, scroll down until you see “Remote Support” and enable it. Now, open the Zoom desktop client, navigate to settings by clicking your account icon in the top-right corner of the window, and select “Share Screen” from the left navigation pane. From the options displayed, check the box next to “enable the remote control of all applications”.
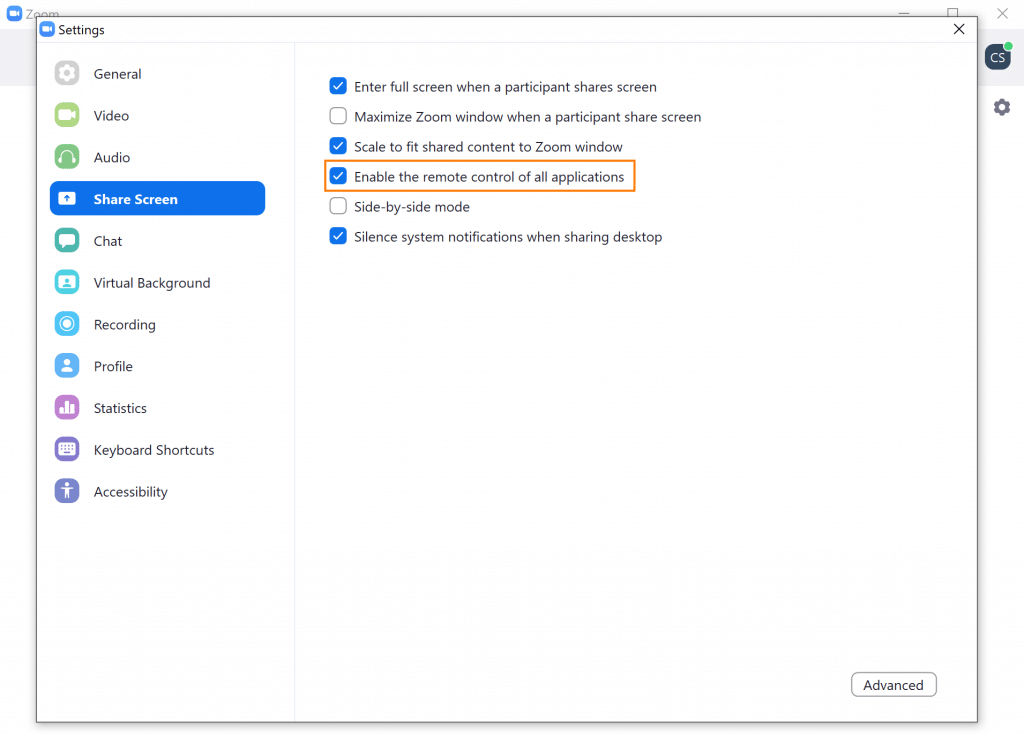
By taking these steps, the host of a one-on-one meeting can request help resolving issues occurring on their computer’s desktop, within Zoom, or even applications outside of Zoom. That said, be aware that those offering assistance will be unable to access admin credentials or the computer’s security settings; making this option only suitable for easily resolved problems.
For those interested in putting this feature to the test, begin a one-on-one Zoom meeting with another participant. If the steps above were followed correctly, a new support icon will appear at the bottom of the window. Clicking the arrow next to it will bring up three options: request desktop support, request application support, or request computer restart. Selecting one of these three options will then send a prompt to the other individual’s device, allowing them to temporarily control your computer or an application within it.

Microphone Shortcuts
From the playful screams of children to the occasional bark of household pets, working from home has a tendency to bring about a variety of audio distractions. Whatever it may be, it’s important to not let what’s distracting you interfere with the group conversation. In turn, it’s courteous to mute your device’s mic so as to not interrupt speakers with unruly background noise.
And although Zoom gives the option to use your mouse or trackpad to repeatedly select and click the mute button, it’s easy to forget when your mic is muted or unmuted. Alternatively, Zoom offers a “push to talk” that allows individuals to toggle their mute switches with the click and hold of one button. By default, pressing and holding the spacebar on a keyboard will temporarily unmute a microphone. When released, the microphone will go back to being muted. On the other hand, if holding the spacebar is too tedious while multitasking, consider pressing the “Alt” and “A” keys simultaneously to toggle your device’s mute without the need for a mouse.
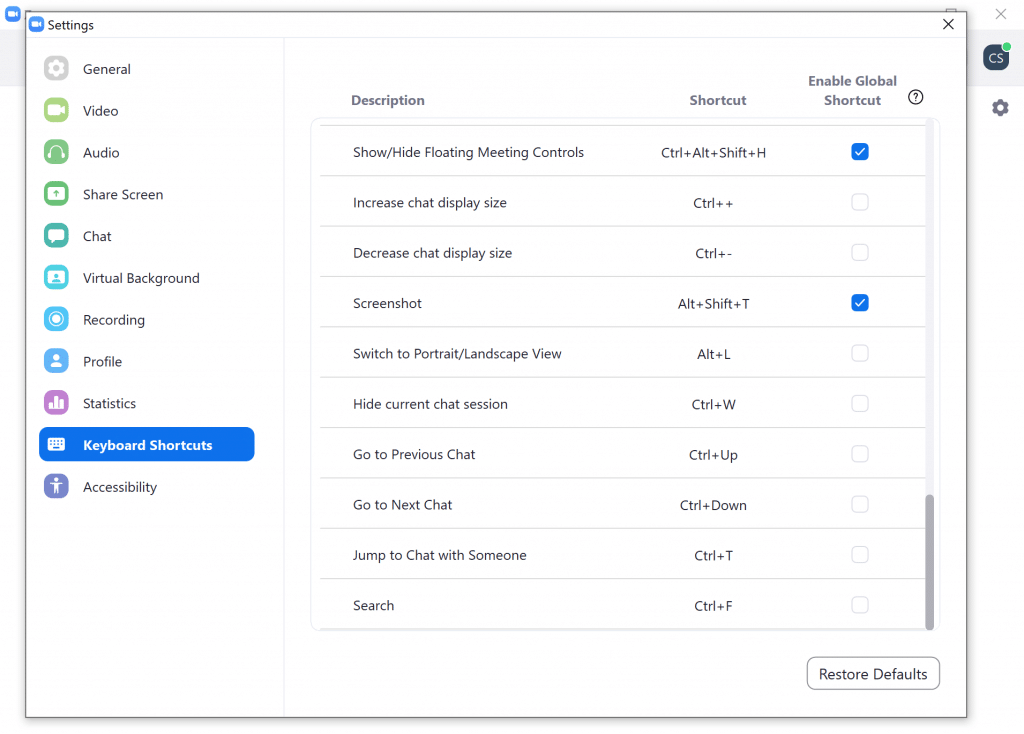
While, by default, these shortcuts only work while the Zoom window is open and prioritized, there is an option to enable push to talk while outside of the app. Simply open the Zoom client, click your account profile in the top-right corner of the window and select settings. From the window that appears, select Keyboard Shortcuts, and click the checkboxes next to each shortcut you’d like to enable while outside of the app.
Easter Eggs for Paid Zoom Subscribers
Recording Transcription
While Zoom is great for making business calls, it’s also useful for capturing and sharing webinar content. But before distributing any pre-recorded content to audiences, it can be beneficial to take a few extra steps to ensure it can be enjoyed by all. In particular, using Zoom’s auto transcription feature, hosts of the webinar can make sure those who are hearing impaired have an equal opportunity to acquire the insight presented in the content.
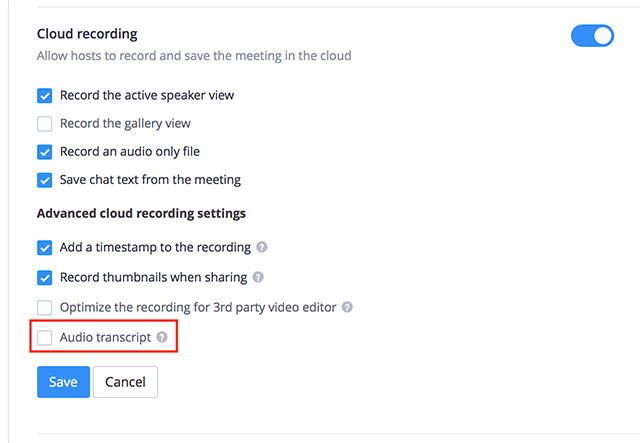
Unlike the most of the other Easter eggs on this list, the Audio Transcript feature is only accessible to those with a paid business, education, or enterprise plan. To enable this feature, navigate to Zoom’s web portal (not the desktop client). Once logged in, click on My Account and select Settings from the menu on the left side of the screen. Within this sub-menu, choose the tab labeled Recording, and enable Cloud Recordings. Next, scroll down, click the advanced tab, check the box next to Audio Transcript, and save. Now, after recording the next video, the closed caption option will be available at the bottom-right corner of the screen.
Additionally, once a recorded webinar is done processing, hosts of the segment will not only be emailed a video link, but also a file containing transcribed text from the recording. In turn, marketers may find this text useful for quickly creating blog content or improving the search engine optimization of any shared webinars.
Record Separate Audio for Each Participant
Although Zoom makes it rather easy to collaboratively produce podcasts or YouTube videos while working remotely, from an audio quality standpoint, the default settings of Zoom leave a lot to be desired. In particular, because the default settings group every participants’ voice into one audio track, it can be tedious to isolate and control sounds in post-production.
Fortunately, there’s an audio setting buried deep in Zoom that allow hosts to record separate audio for each participant. In turn, this gives producers the ability to target and delete background noise from a single participant, without cutting the voice of the main speaker. Additionally, because it’s likely that each participant is using different audio equipment to record, this feature makes it far easier to equalize and normalize the audio of each individual and not distort the entire track doing so.
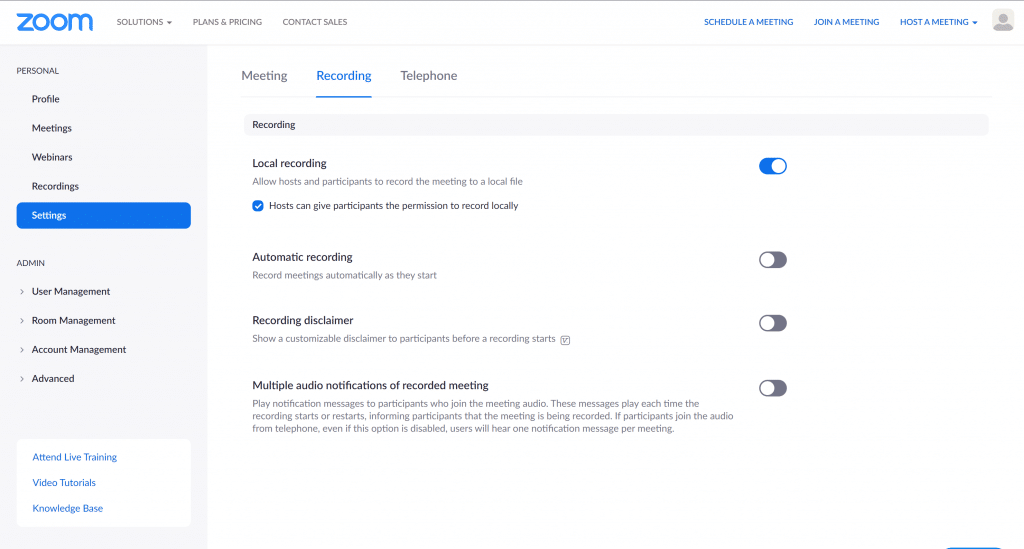
For those with a paid Zoom plan, navigate to the Zoom web portal, select My Account, and click Recordings from the menu on the left side of the screen. Once here, make sure Local recording is enabled. Once you’re certain, navigate back to the Zoom desktop client, open the settings by clicking on your account icon, choose recordings, and check the box next to “Record a separate audio file for each participant who speaks”.

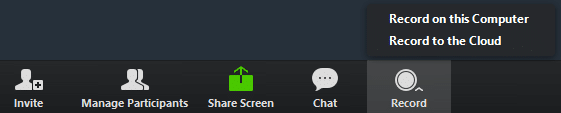
Now, when beginning a new meeting, click the arrow next to “Record” and select “Record to this computer”. Because these files are too large to be housed in Zoom’s cloud storage, they’ll typically be housed within the Documents folder of a device.
Is the Hunt Over?
As this list of Easter eggs shows, Zoom’s simplistic user interface is only a rouse. Underneath that minimalistic exterior lies a wealth of features; ready to help you remain productive while away from the office.
But, as you can tell from some of the features mentioned, Zoom does lock some of its more complex features under paid subscription plans. Keeping that in mind it’s important to notes that one-on-one calls within Zoom are free with no time limit. On the other hand, for individuals that need to conduct a video call with multiple users, the free time limit is restricted to 40 minutes per call. If that limit is exceeded, each user will need a paid account, starting at $16 a month.
For a checklist of more technology businesses can implement to facilitate a remote working environment, check out https://rocketit.com/work-from-home/.
Related Posts


Subscribe to Rocket IT's Newsletter
Stay up to date on trending technology news and important updates.

Find out if Rocket IT is the right partner for your team
Claim a free consultation with a technology expert.