Outlook Easter Eggs: Discovering Microsoft’s Hidden Features

While the words “Easter eggs” may spark images of brightly colored eggs, in technology, Easter eggs refer to hidden features tucked within software applications or computer hardware that the average user is unaware of. And, like the traditional definition of an Easter egg, the real joy of finding these features is the surprise and the excitement that comes along with it.
Depending upon how well these features are hidden, it can take months or even years for Easter eggs to be discovered by the technology’s user base. That said, Microsoft Outlook has risen to the fourth most used email client with over 400 million active users worldwide, making it a prime candidate from some interesting hidden features. While most of us use Outlook every day, have we found all the Easter Eggs it has to offer? Here are six features concealed in Microsoft Outlook that will maximize your productivity.
Schedule Emails
First up on our list, let’s take a look at Outlook’s Delay Delivery feature. Through this setting, it’s possible to schedule emails days, weeks, or even months in advance. While, for event planners, this is a great feature to check out for sending reminders, it’s also helps to avoid sending business contacts emails outside of normal business hours.
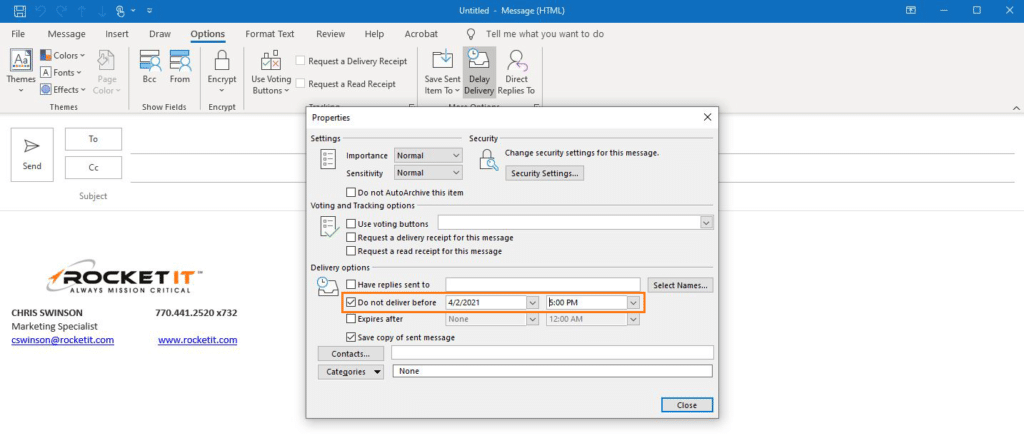
How to Schedule Emails in Outlook
Once your email is written, click the Options menu at the top and then select Delay Delivery. In the window that pops up, click the box next to “Do Not Deliver before” and set the date and time you’d like your email sent out. Click Close and then click send. Your message will not be sent before your specified time.
Read & Delivery Receipts
Have you ever sent an email and wondered if the recipient actually opened and read it? If so, you’re not alone and Microsoft has included a feature to help with just that. To mitigate the mental gymnastics of wondering if your email reached its destination, take a peek at Outlook’s Delivery and Read Receipts feature.
How to Turn on Tracking for All Emails in Outlook
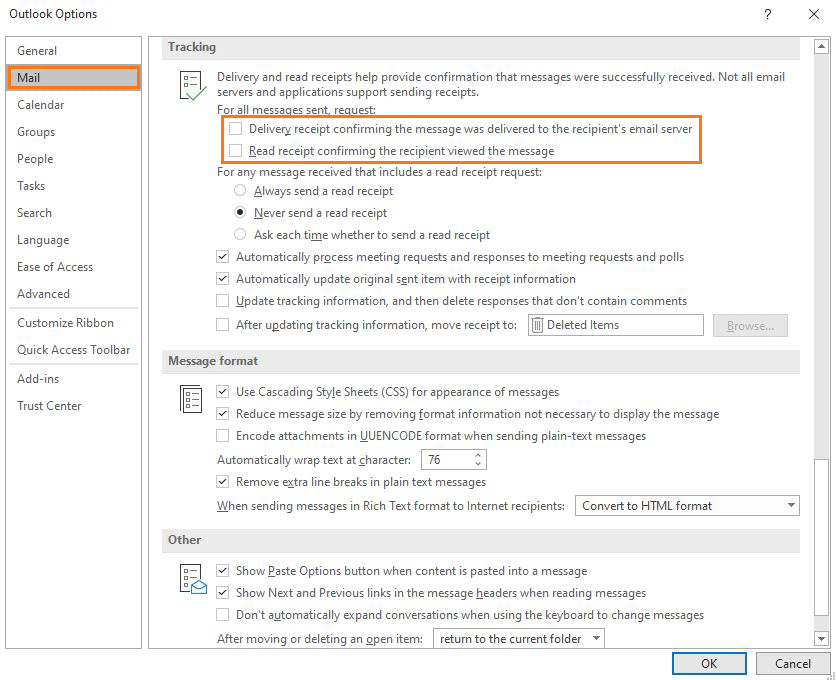
To track if your future emails are viewed by recipients, first open the File menu and then select Options. Click on Mail and scroll down to the section titled Tracking. Click the box next to “Delivery receipt confirming the message was delivered to the recipient’s email server” to turn on Delivery Receipts and “Read receipt confirming the recipient viewed the message” to turn on Read receipts. Click “OK” to apply your changes.
How to Turn On Tracking for Individual Emails in Outlook
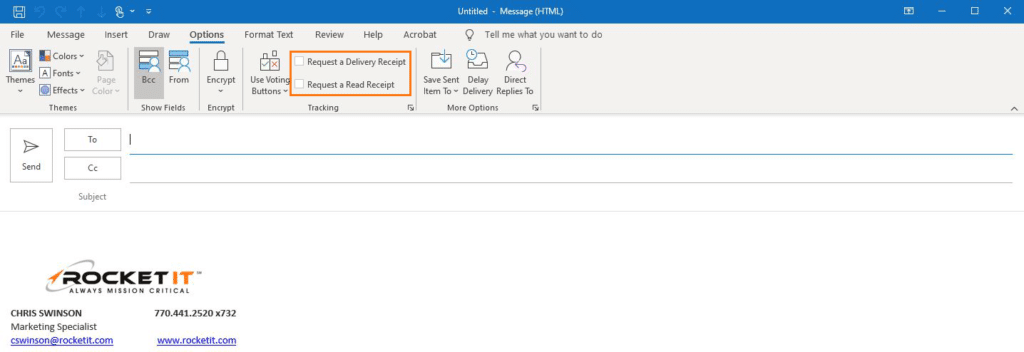
But let’s say you don’t want to track the delivery and read receipt of all emails. Instead, you simply want to track a single email. To accomplish this, open a new email message and click on Options at the top. In the Tracking subgroup, click the boxes next to “Request a Delivery Receipt” and “Request a Read Receipt.” Finish writing your email and then click Send.
How to Track Email Open Rate in Outlook
Perhaps you send an email to hundreds of individuals and you want to know how effective your messaging was. In Outlook, there’s a way to check the open rate of emails that were sent using one of the tracking methods used above. To view an email’s open rate in Outlook, navigate to the original message, usually located in the Sent Items folder. In the Message menu, go to the Show subgroup and click Tracking. Tracking will only appear once at least one receipt has been received.
While tracking can be useful for numerous reasons, keep in mind that recipients can decline sending receipts. As a best practice, only request receipts for important messages, not all, to increase the likelihood of individuals consenting to sending a receipt.
Make Your Time Count
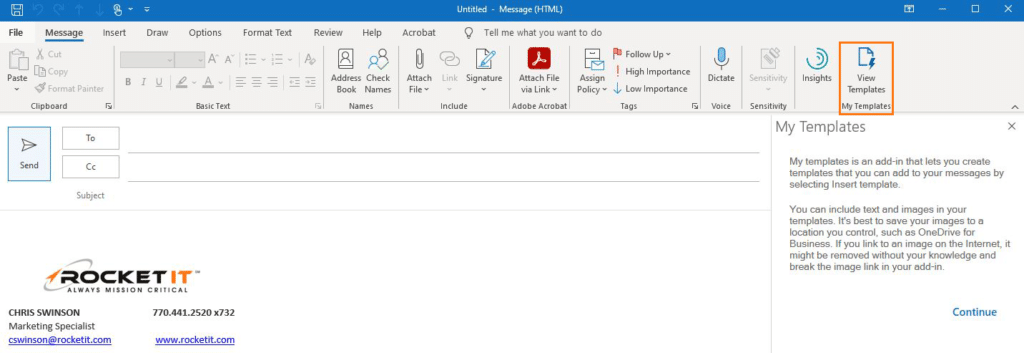
Do you find yourself sending the same email repeatedly? If so, Outlook’s email template feature can streamline the process and save you hours of work each week.
How to Create an Email Template in Outlook
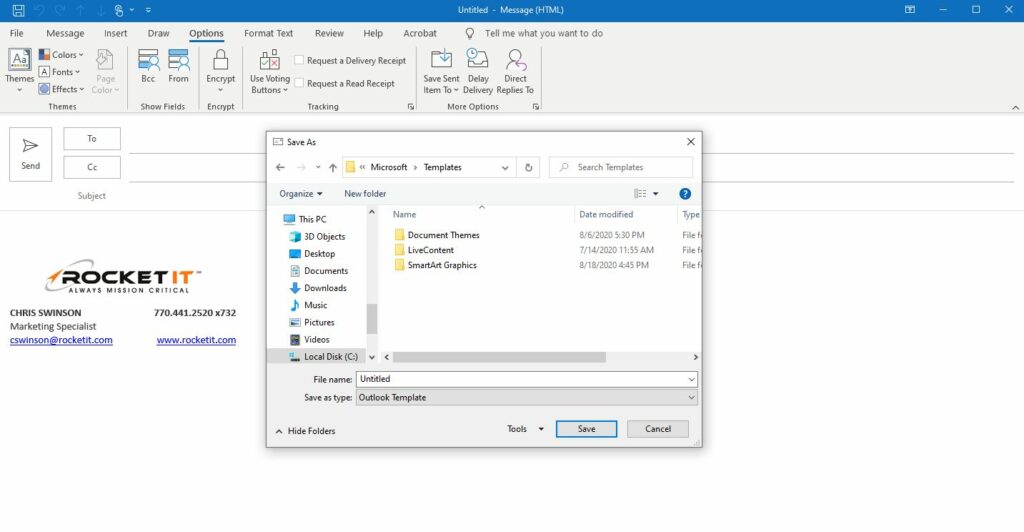
To create an Outlook email template, compose a new email with the content you’d like included in the template. In the message window, click File and then select Save As. Choose “Outlook Template” in the drop-down menu next to Save As. Type the name of your template in the File Name box and then click Save. Once created, you can apply your new template by creating a new email and clicking the “View Templates” button on the far-right of the top menu bar.
Never Miss a Thing
If you have work activities and extracurriculars filling up your schedule, Outlook lets you create multiple calendars to stay organized. Even better, Microsoft has designed this feature in such a way that each new calendar you add is assigned a unique color, making it easy to differentiate event categories and avoid confusion.
How to Create a New Outlook Calendar
Navigate to your Calendar and click the Home tab in the top ribbon. In the Manage Calendars section, click “Add a Calendar” and in the drop-down menu select “Create New Blank Calendar.”
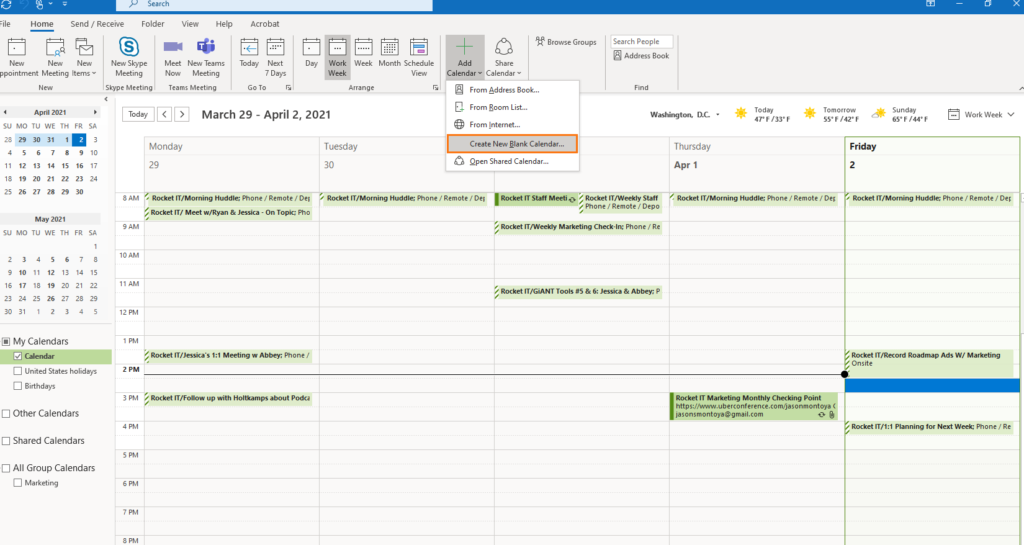
In the Create New Folder menu that pops up, type the Name of your new calendar and then press OK. Your new calendar will then appear in the My Calendars section.
By default, the calendars will appear side-by-side, but if you prefer seeing a full snapshot of your day, right click a calendar in the My Calendars section and choose “Overlay.” As an added bonus Easter egg, right clicking a calendar also allows you change the color and delete the calendar.


Quicker Calendar Entries
When making and confirming appointments through email, it might get tricky remembering to add them to your calendar. But creating meetings and appointments in Outlook takes time, and once misclick of the keyboard can have your guest arriving to an event at 8 pm instead of 8 am. For those who are looking to make calendar entries quickly Outlook’s drag and drop feature may be helpful.
How to Drag and Drop an Outlook Calendar Event
By dragging an email over the calendar icon, Outlook will do the hard work of copying the content into a calendar appointment. You can then verify that the date, time, and location are correct then hit Save.
Insightful Connections
Outlook Insights is an add-in that makes completing action items, following up, and managing your time easier. For internal communication, it’s a great means of tracking how many recipients have interacted with your emails or documents, while also ensuring the behavior of team members remains anonymous for privacy concerns.
How to Install Outlook Insights
Using Outlook Insights requires Microsoft MyAnalytics to be previously activated on your Microsoft account. Keep in mind, not every Microsoft 365 license includes Microsoft MyAnalytics, so it’s important to first check if your plan includes MyAnalytics by clicking here. Once you’ve ensured MyAnalytics is bundled with your service, you’re going to need it installed on your device.
If you’re a individual, once MyAnalytics is activated, the Insights feature should automatically appear in Microsoft Outlook. Simply open Outlook and click the Insights icon in the Home tab of the top ribbon. Once selected, a new menu will appear, allowing you to plan time away from work, set daily focus time, view outstanding tasks, prepare for meetings, set lunch hours, and more.
On the other hand, if you’re looking to implement Outlook Insights for an entire organization, you’ll need to plan the installation with your IT provider. Should you need help with this process, click the chat button below to get immediate assistance from Rocket IT.
While this list of Easter eggs showcases some of Microsoft Outlook’s hidden and most innovative features, it is by no means a comprehensive guide. There are lots of other customizable features designed to improve your productivity and make emailing simpler. Email continues to play a significant role in our work and personal lives, it’s important to give your organization a stable network; capable of cutting your email server’s downtime by 42 percent. If your email system is out of date or needs an overhaul, take the proactive step to ensure your business stay up and running by giving Rocket IT a call at 770.441.2520.
Related Posts


Subscribe to Rocket IT's Newsletter
Stay up to date on trending technology news and important updates.

Find out if Rocket IT is the right partner for your team
Claim a free consultation with a technology expert.